Jira Automation: Labels


Aug 17, 2021
•
6 min
•
Sep 30, 2025

Written by: Deinis Grigorjevs
Hello everyone! 👋🏻 Guess all of you have struggled with huge amounts of Jira tasks and issues on board, that are very hard to follow. Most problems come with the tasks that require attention from your teammates in order to complete. It’s really struggling to follow all comments and notifications about every step of the issue’s life cycle that usually something falls away from your field of view and later can cause serious misunderstandings and time delay. If this sounds so familiar to you, no matter if you are Project Manager in a huge corporation or just tired of all this as a developer of a small business, this topic is for you.
There is an excellent tool called Jira Automation that we use in Chili Labs (NB! We use Cloud Jira, so maybe this functionality is unavailable for Server Jira). Managed correctly, it can be an irreplaceable daily assistant for every management type.
We separate team members in small groups and give them a Label (name) so later we can link every issue in the Board to a concrete group we need. Sounds complicated at first, but it’s worth a try. Just imagine Jira doing all the separation and moving the issue to its assigned place instead of you. All you need to do is just write a comment under the task and mention the person you need to help in solving the issue.
Here is a small step-by-step guide on how to set it.
Setting up automation.
First of all, you need to create Labels to sort the people you are working with. For example, we recommend using departments as Labels: Development, QA, PM, Design, etc. These are standard issue Labels that Jira offers as one of the task fields.
After creating them, you need to “assign” your teammates to every Label you made according to department they belong to:
1.Go to your “Project Settings” and find paragraph “Automation”. By opening it you see:
2. Go to “Rules”

3. And here on right top corner press “Create rule”

4. In the list of “New Triggers” find a state: “Issue commented” and press on it

5. Save the changes on the next step
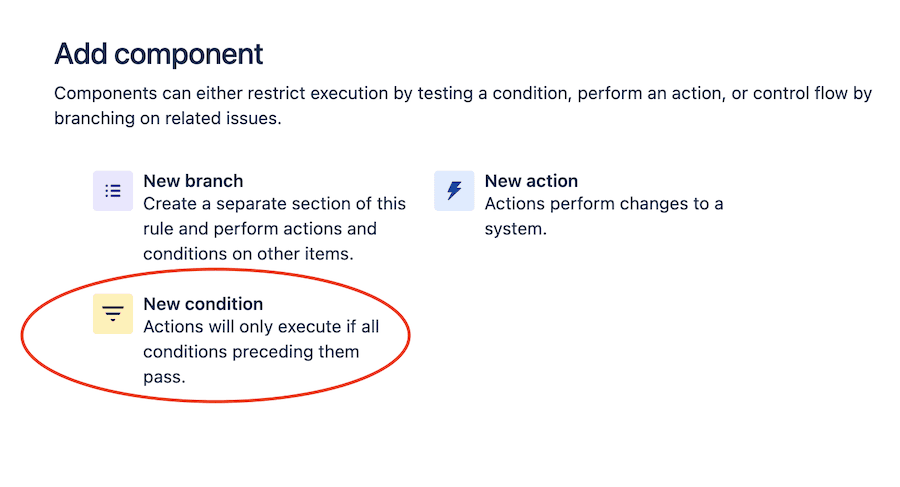
6. Great, first step towards a goal is made! Now add “New condition” on Component list that appears for you now
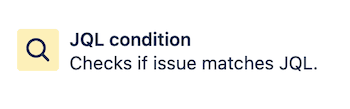
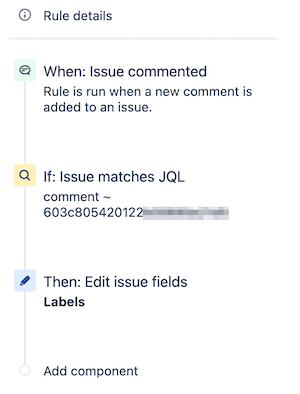
7. Next choice is “JQL condition”
8. A text field for JQL input appears for you:
a) type: “comment ~”
b) after press the “Insert account id” button and add a teammate;
c) now the text in field appears like: “comment ~ 603c8054846122b00g685e3d5”
d) save the changes
9. Same screen as in step №6 appears but now you need to press on “New action” field
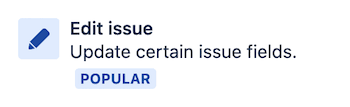
10. Select an “Edit Issue” option
11. On the next step press dropdown button on “Choose fields to set”, and tick “Labels”
12. Then choose a label you want, for example “Development” and save the changes
13. On the last step, name your automation and

14. Also check is the sequence of “Rule Details” on left looks same:
15. Return to list and check if green switcher for automation is switched on
16. Now on screen you see all your automations that you can enable and disable, also edit at any time
17. Repeat same steps with every Person from your team you want to link the Label with
Congrats!!! 🙌🏻 You have successfully made automation work for you! Now, let’s check how to make it work for a project.
Tasks. Comments.
It is a very good habit to comment task at every important step. This prevents misunderstandings and inconveniences and allows everyone (client, PM, other team members coming to project, newcomers and etc.) to understand current progress and past actions made on every issue. We suggest you don’t skip this procedure and just shortly state, if any crucial changes were made. As we set up automation for the Jira project, now you can use it in real time! If there are updates on task or other department interaction is required, write it down in comments: what changes and things should be done. Also do not forget to @mention a teammate, who can help you. By doing this action, JIRA will automatically label the department of a tagged person working in (QA, Development, PM, Design, Back-end etc.) (read about labels above). By adding next person in comments, JIRA will automatically change the label to the last mentioned in comments, that way making a task to “travel” between departments. It is also good practise to notify about these changes the person you mentioned using internal company chat or mutually, just to be sure that things worked (as we know all systems get errors from time to time). As well, it would be great if everyone in your team has Jira email notifications enabled, including JIRA actions. It will help you to stay updated if any changes were made on issues you are enrolled in.
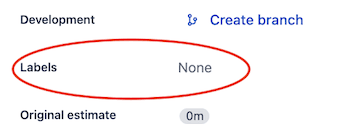
Tasks. Labels. After mentioning some person in any issue’s comment, the label will automatically change accordingly.
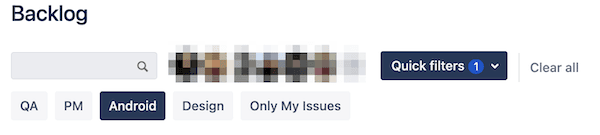
To see all Label related tasks, you should:
- open Project Board and in the top of screen under BACKLOG you will find a dropdown button “Quick filters”

- By pressing it the label buttons will appear below
- On this step by selecting any of the labels (or several of them) on board you will see just the tasks with the chosen label). Label “Only My Issues” indicates ONLY tickets ASSIGNED to you (not mentions in comments)
Also, you can add separation by Labels to any board you are working on (Kanban or Scrum). Jira will separate issues not only by swim-lanes, but also by Labels. To enable it go to board settings and choose “Quick Filters”. On that step use JQL one more time and add text as shown in example:
Now, by moving back to Project board you will have a separation of all tasks according to Labels in Horizontal lines.
Whoa! 🙌 Thanks for reading this article! I really hope it will help you to save your time and have even more precision on your daily struggles. Have a nice day!