Segmented State Pattern with DelayedResult

Nov 25, 2022
•
5 min
•
Sep 30, 2025

Written by: Daria Orlova
Segmented State Pattern with DelayedResult
If you have developed at least one application, you’ll know that one of the most common flows that you will handle is:
-
Make an asynchronous request to somewhere (API, database, etc.)
-
Show progress while you wait for a response
-
Show an error if the request failed
-
Show success & the according UI if the request succeeded
Pre-requisites
This flow can be handled in many ways, depending on the chosen architecture, state management, app visual design, and so on. In this tutorial, I want to show a very specific approach that we implement in our Flutter apps. Because we use the BLoC pattern via flutter_bloc, the example will be based on it, but in reality, you can use this approach and specifically this class with other state management solutions. In the article, I will be assuming that you have at least a little experience with Flutter & flutter_bloc.
Segmented State pattern
The first time I read the name “Segmented State pattern” was in the list of state management options in the Flutter docs. It resonated with me because it precisely describes the common state values that you will be engaging with again & again during your development process. These values are loading, error & state. Personally, I would also add an idle state, for cases when the action has not been initiated yet.
In our projects, we have been using the BLoC pattern via flutter_bloc library for several years now and it’s working perfectly for us. This is our preferred state management solution. The idea is that you wrap your widget in a bloc (or cubit), and listen to its state changes. As well as submit events when an interaction happens. The UI is always just the representation of the bloc state, nicely implementing the uni-directional data flow approach.
The next question though is how to design that state. Let’s review some of the approaches and based on their cons, we will arrive at our end result, the DelayedResult.
The basic approach
The first approach that comes to mind, is to just control those aspects with dedicated variables. So we will have one for progress, error, and value.
class HomeState {
	final bool inProgress;
	final Exception? error;
	final T? value;
}
Ok, this seems to look fine and we can handle our state with that. Why not?
Well, first of all, even if you’re super disciplined, have tests & so on, nothing is stopping you from setting the progress, the error & the value simultaneously. But we want our state to be mutually exclusive, we want to definitely know whether it is in progress or error, or has value.
Another thing is that if we have more than one action that can have all of these states, we will need to add three more fields. And so on for every action. This can quickly become hard to manage:
class HomeState {
	final bool dashboardInProgress;
	final Exception? dashboardError;
	final DashboardData? dashboardValue;
	final bool saveInProgress;
	final Exception? saveError;
	final T? saveValue;
}
The enum approach
We can make the state status algebraic and extract the status into an enum, like that:
enum HomeDashboardStatus { initial, progress, error, success }

class HomeState {
    final HomeDashboardStatus status;
    final Exception? error;
    final DashboardData? value;
}
With this approach, we can always trust the status itself. But the problem of the status being in progress, yet the error field being present or other incompatible combinations is still a possibility.
The inheritance approach
The next level would be to use inheritance. For example, we could have something like this:
abstract class HomeDashboardState {}

class HomeDashboardIdleState extends HomeDashboardState {}
class HomeDashboardLoadState extends HomeDashboardState {}
class HomeDashboardErrorState extends HomeDashboardState {
    final Exception? error;
}
class HomeDashboardSuccessState extends HomeDashboardState {
    final DashboardData? dashboard;
}

class HomeState {
    final HomeDashboardState dashboardState;
}
This approach solves the previous inconsistency problems but introduces a lot of boilerplate. You need to create a base class and 4 overrides for each possible state. If you have several in one bloc, this becomes very cumbersome. Then in UI, you need to check the runtime type and cast, which leads to more code. You could solve that part with extensions, but that's even more code, an extension for each abstract state… Especially, considering that skeleton looks really quite the same, so maybe we can abstract it away?
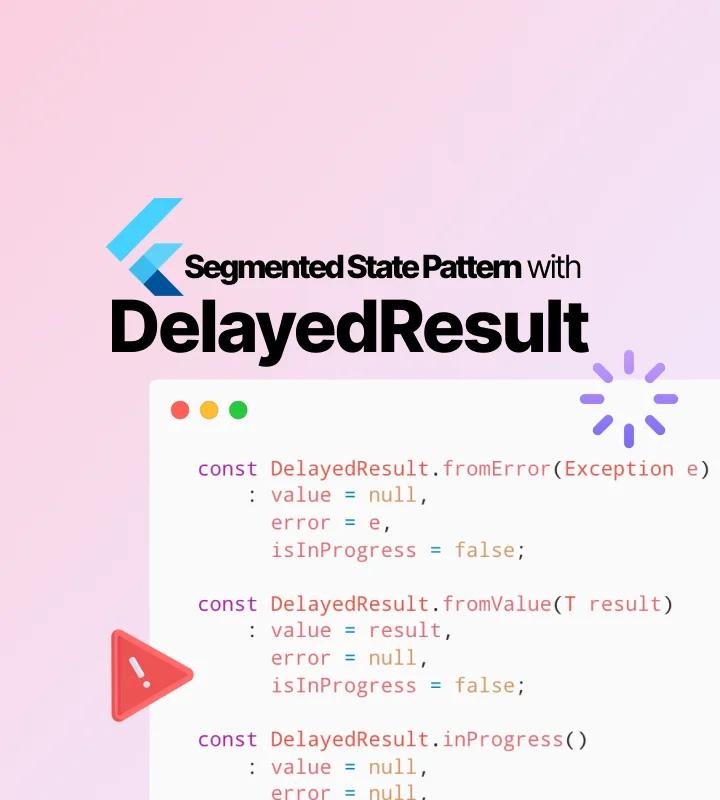
The DelayedResult approach
With this thought in mind, I want to present you the DelayedResult class:
class DelayedResult<T> extends Equatable {
  final T? value;
  final Exception? error;
  final bool isInProgress;

  const DelayedResult.fromError(Exception e)
      : value = null,
        error = e,
        isInProgress = false;

  const DelayedResult.fromValue(T result)
      : value = result,
        error = null,
        isInProgress = false;

  const DelayedResult.inProgress()
      : value = null,
        error = null,
        isInProgress = true;

  const DelayedResult.none()
      : value = null,
        error = null,
        isInProgress = false;

  bool get isSuccessful => value != null;

  bool get isError => error != null;

  bool get isNone => value == null && error == null && !isInProgress;

  @override
  List<Object?> get props => [value, error, isInProgress];
}
By creating it once, we can then use it in our blocs like this:
class HomeState {
	final DelayedResult<DashboardData> dashboardResult;
	final DelayedResult<bool> saveResult;
}
We have one field that definitely describes its status and all related data to it. We can use it in all places in our app that conform to this pattern (which, from my experience, is often) and we don’t write a lot of boilerplate code.
Example
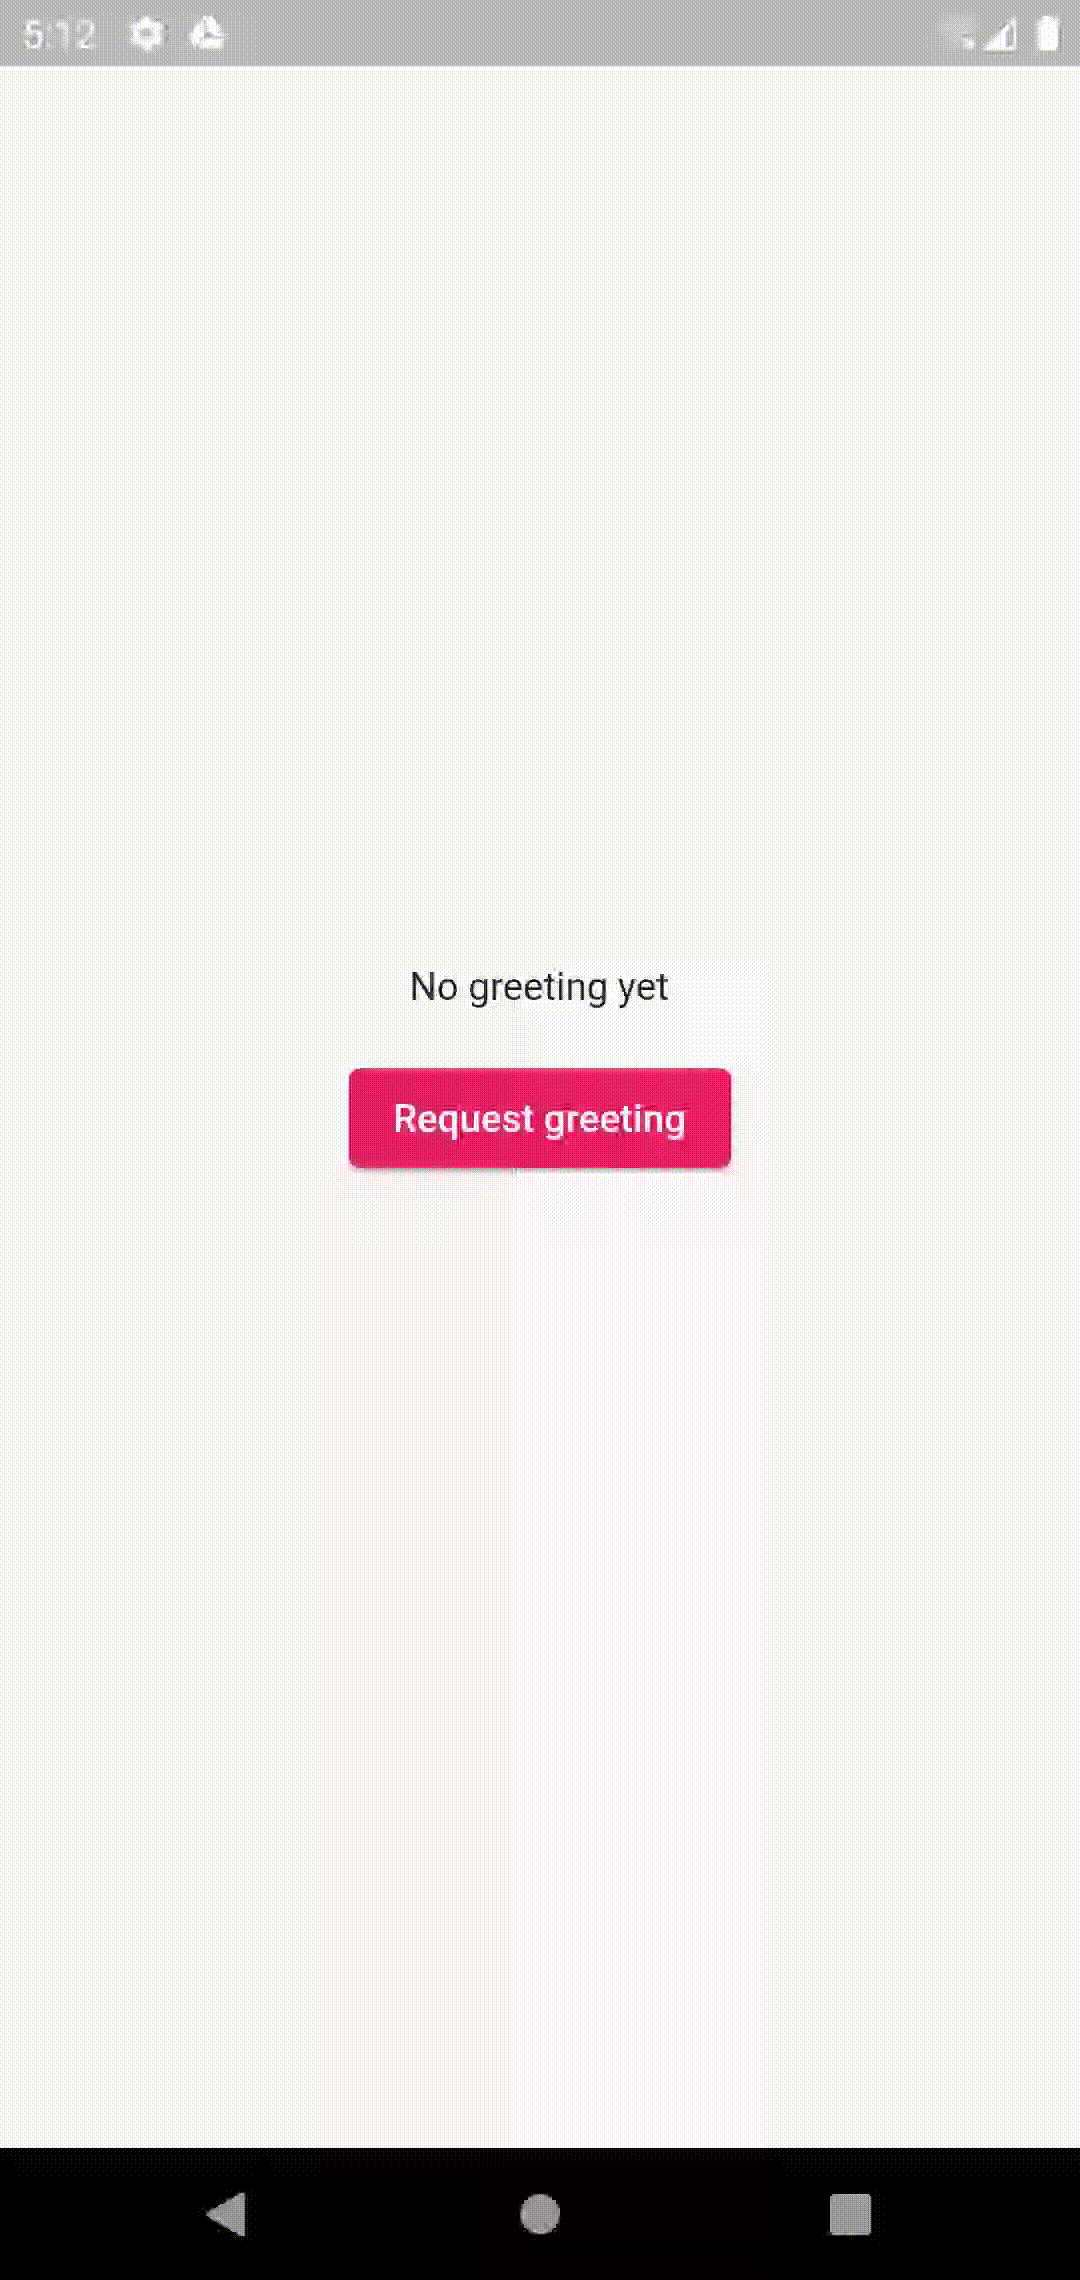
Now let’s take a look at a full sample app.
The app we will create as an example will be ultra simple and academic, but it will showcase the problem & the solution concisely.
- When the user opens the app, he has not greeted it yet, so we will show an idle state.
- The user can request a greeting, but because it takes some time, we will show a loading status.
- If the greeting is successful, we will show an according to state and a button to request another greeting.
- If something went wrong and an error happened, we will say so and show a retry button.
For now, the DelayedResult isn’t an actual Dart package, because it’s basically one class, although we do use it in our projects internally.
You can find the example source code here.
We will need these dependencies in our pubspec.yaml (versions at the time of writing):
You can get the DelayedResult here.
equatable: ^2.0.5
flutter_bloc: ^8.1.1
delayed_result:
  git:
    url: https://github.com/ChiliLabs/dart-delayed-result.git
    ref: main
Then we will create our bloc event:
abstract class HomeEvent extends Equatable {
  const HomeEvent();
}

class GreetingRequested extends HomeEvent {
  const GreetingRequested();

  @override
  List<Object> get props => [];
}
Our bloc state. We can imagine, that in a real app the name comes from a repository or as an argument:
import 'package:delayed_result/delayed_result.dart';
import 'package:equatable/equatable.dart';

class HomeState extends Equatable {
  final String name;
  final DelayedResult<String> greetingResult;

  const HomeState({
    required this.name,
    required this.greetingResult,
  });

  HomeState copyWith({
    String? name,
    DelayedResult<String>? greetingResult,
  }) {
    return HomeState(
      name: name ?? this.name,
      greetingResult: greetingResult ?? this.greetingResult,
    );
  }

  @override
  List<Object> get props => [name, greetingResult];
}
And then the bloc itself:
class HomeBloc extends Bloc<HomeEvent, HomeState> {
  final HomeRepository _homeRepository;

  HomeBloc(this._homeRepository)
      : super(
          const HomeState(
            name: 'Rainbow Dash',
            greetingResult: DelayedResult.none(),
          ),
        ) {
    on<GreetingRequested>(_onGreetingRequested);
  }

  void _onGreetingRequested(
    GreetingRequested event,
    Emitter<HomeState> emit,
  ) async {
    if (state.greetingResult.isInProgress) return;
    emit(
      state.copyWith(
        greetingResult: const DelayedResult.inProgress(),
      ),
    );
    try {
      final greeting = await _homeRepository.greet(state.name);
      emit(
        state.copyWith(
          greetingResult: DelayedResult.fromValue(greeting),
        ),
      );
    } on Exception catch (ex) {
      emit(
        state.copyWith(
          greetingResult: DelayedResult.fromError(ex),
        ),
      );
    }
  }
}
Let’s stop here for a second and see what’s going on in here.
When we get a GreetingRequested event, we check if it’s already in progress and if it is, don’t do anything.
Otherwise, we emit progress and start fetching the result. If everything is fine, we emit a value, if something went wrong, we emit an error. Pretty straightforward, no magic here.
Let’s take a glance at HomeRepository. Basically, we just return an error every other time for testing purposes and have an artificial delay to see progress:
class HomeRepository {
  var _shouldThrow = true;

  Future<String> greet(String name) async {
    await Future.delayed(const Duration(seconds: 3));
    if (_shouldThrow) {
      _shouldThrow = false;
      throw const GreetingException(message: 'Could not say hi :(');
    }
    _shouldThrow = true;
    return 'Hey there, $name! Have a great day :)';
  }
}
And the last thing, we will take a look at our HomePage:
class _HomePageState extends State<_HomePage> {
  late HomeBloc _bloc;

  @override
  void initState() {
    super.initState();
    _bloc = context.read();
  }

  @override
  Widget build(BuildContext context) {
    return Scaffold(
      body: BlocBuilder<HomeBloc, HomeState>(
        builder: (context, state) {
          final result = state.greetingResult;
          final isProgress = result.isInProgress;
          if (isProgress) {
            return const _GreetingStatus(
              status: 'Requesting greeting...',
              child: CircularProgressIndicator(),
            );
          }

          final error =
              result.isError ? _mapExceptionToError(result.error) : null;

          final isError = error != null;
          if (isError) {
            return _GreetingStatus(
              status: error,
              child: ElevatedButton(
                onPressed: _requestGreeting,
                child: const Text('Retry'),
              ),
            );
          }

          final isNone = result.isNone;
          final value = result.value;

          if (isNone || value == null) {
            return _GreetingStatus(
              status: 'No greeting yet',
              child: ElevatedButton(
                onPressed: _requestGreeting,
                child: const Text('Request greeting'),
              ),
            );
          }

          return _GreetingStatus(
            status: value,
            child: ElevatedButton(
              onPressed: _requestGreeting,
              child: const Text('Request another greeting'),
            ),
          );
        },
      ),
    );
  }

  void _requestGreeting() {
    _bloc.add(const GreetingRequested());
  }

  String? _mapExceptionToError(Exception? ex) {
    if (ex == null) {
      return null;
    } else if (ex is GreetingException) {
      return ex.message;
    }
    return 'Something went wrong';
  }
}
So what we do here, is we listen to the bloc state changes, and based on the DelayedResult value in there we return different widgets. Of course, you can apply this approach to many more cases, like navigating to a different page in the BlocListener if a specific DelayedResult emitted a success state, showing an error via SnackBar instead of full screen, or blocking a button with a progress bar instead of hiding it, and so on.
Conclusions
The DelayedResult usage is a no-brainer in all of our projects. It eliminates the need to create new classes just for the sake of the state and provides a neat API for mapping business logic state to UI state. It also plays nicely with the BLoC and specifically the flutter_bloc package by Felix Angelov.
I hope you found this article useful. If you have questions or suggestions, feel free to reach out to me on Twitter.
Read more about how we approach development at Chili Labs in our blog 🌶️️
— Daria 💙